Japan experiences more earthquakes than almost any other nation on Earth. With over 1,500 measurable seismic events recorded every year, preparation is not an option — it is a fundamental part of safe, everyday life. The good news is that a significant proportion of earthquake-related injuries occur not from building collapse, but from objects falling inside your home. A few hours of DIY work can dramatically reduce your household risk.
According to data from Japan's Consumer Affairs Agency and the Tokyo Fire Department, the majority of indoor earthquake injuries are caused by toppling bookshelves, refrigerators, glass-fronted cabinets, and televisions. These hazards strike fastest in the first seconds of strong shaking — long before evacuation is even possible. That means your safest action is preparation, done well before an earthquake strikes.
This guide walks you through practical, affordable, and highly effective DIY measures: anchoring furniture, identifying danger zones room by room, assembling the right materials, and understanding fire prevention — because fires triggered by post-earthquake gas leaks and overturned appliances remain one of the most serious secondary hazards in Japan's urban seismic experience.
Furniture Anchoring — Step by Step
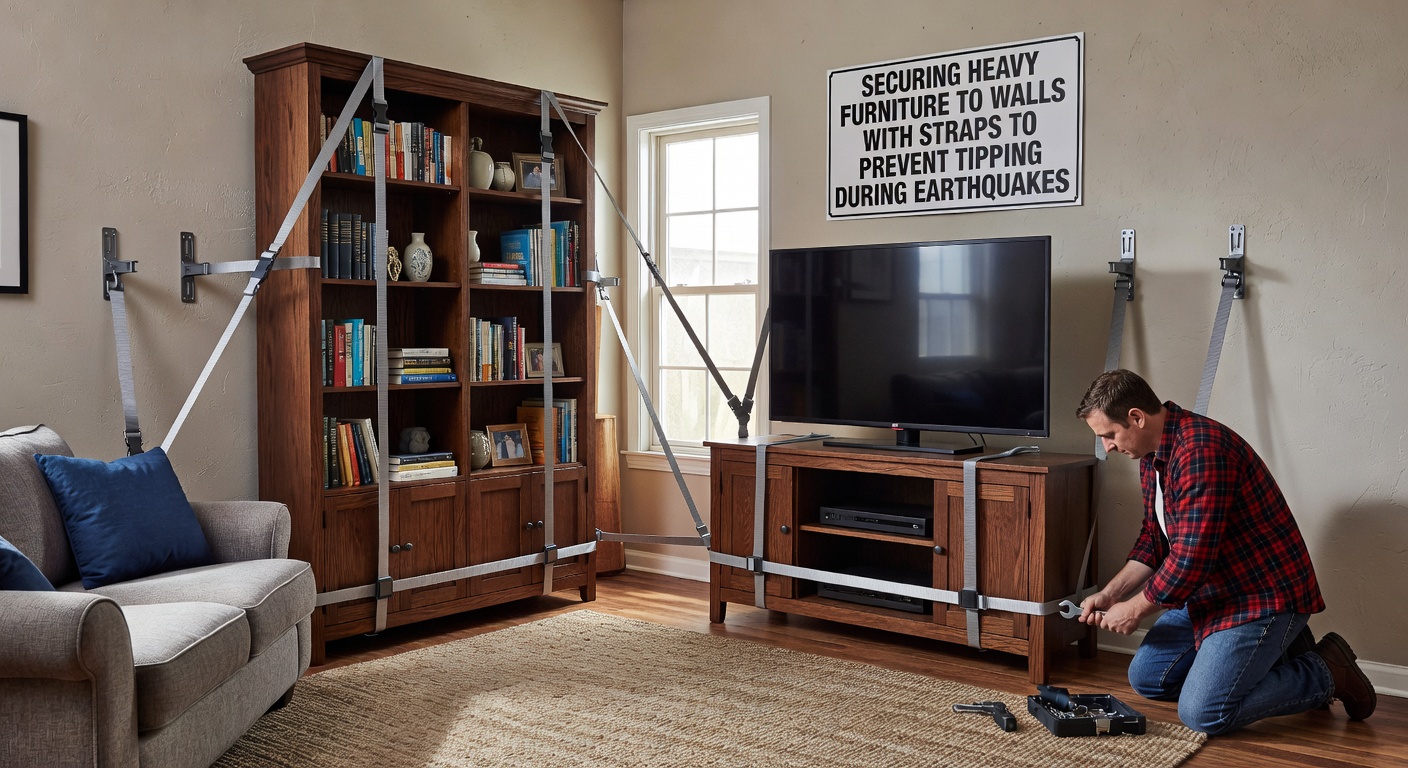
Anchoring tall and heavy furniture to walls is the single most effective thing most households can do to prevent earthquake injuries. The goal is to limit furniture from tipping forward during lateral shaking. Even affordable L-brackets and furniture safety stoppers, properly installed, can withstand the forces generated by a magnitude 6 earthquake.
Before You Begin
Locate the wall studs (structural timbers inside your wall) before drilling. A simple electronic stud finder, available at any home center (ホームセンター) for around ¥2,000–¥4,000, will detect stud positions. Studs in Japanese homes are typically spaced 303 mm or 455 mm apart. Screws anchored into studs — rather than drywall alone — provide the necessary holding strength.
Anchoring Bookshelves and Storage Units
-
Empty and position the unitMove the bookshelf to its final intended position. Remove all contents so the unit is lighter and easier to maneuver. Ensure at least 5–10 cm clearance from the wall at the top to accommodate the bracket.
-
Locate wall studsUsing a stud finder, mark stud positions on the wall with a pencil at the height where you plan to attach the bracket. Confirm by tapping — studs sound solid rather than hollow. Double-check with a thin nail before committing to the final hole.
-
Choose the correct L-bracket sizeFor units taller than 120 cm, use brackets with at least a 7.5 cm x 7.5 cm arm span and a minimum 3 mm steel thickness. For units over 180 cm, use two brackets placed at the top corners of the unit for maximum stability.
-
Drill pilot holesUse a drill bit slightly smaller than your screw diameter to create pilot holes — both in the wall stud and in the back panel of the furniture. This prevents wood from splitting and ensures a tight, secure fit.
-
Attach the bracketSecure one arm of the L-bracket to the wall stud using wood screws at least 65 mm (2.5 inches) in length. Attach the other arm to the top rear panel of the furniture. Use a washer under each screw head for broader load distribution.
-
Test and reloadPush firmly on the top of the unit toward the wall and then pull outward. There should be minimal movement. If the unit flexes, check that screws are fully tightened and seated into the stud. Once confirmed secure, reload the shelves — keep the heaviest items on lower shelves.
Securing Refrigerators
Refrigerators are particularly dangerous when unsecured — their height, weight, and typical placement near kitchen exits can create a life-threatening blockage. Most modern Japanese refrigerators have a flat rear panel suitable for wall strapping.
-
Install a refrigerator belt strapPurpose-made refrigerator straps (冷藏御転倒防止ベルト) are available at home centers for ¥1,500–¥3,000. The strap runs from the top of the refrigerator to wall-mounted anchors on either side, preventing forward toppling.
-
Use anti-vibration pads under the feetPlace rubber anti-slip mats or purpose-designed anti-quake pads (職振マット) beneath each foot of the refrigerator. These absorb lateral vibration and reduce “walking” — the incremental movement that shifts the appliance away from the wall during sustained shaking.
-
Confirm gas and water line slackIf your refrigerator has a water dispenser or ice maker connection, verify that the supply line has sufficient slack to allow minor movement without strain. A taut line can rupture during an earthquake and cause flooding.
Securing Televisions and AV Stands
Flat-screen televisions can become projectiles in an earthquake. Their narrow base and top-heavy profile make them especially unstable.
- Use TV-specific anti-toppling straps that connect from the television's VESA mounting holes to the back of the stand or a wall anchor.
- For wall-mounted TVs, verify that wall anchors are sunk into studs — never rely on hollow-wall anchors alone for a television mount.
- Place anti-quake gel pads beneath the AV stand feet to prevent sliding on hardwood or tile floors.
- Reposition the TV stand so it does not face a seating area directly — a toppled screen striking the sofa is one of the most common living-room injury scenarios.
- Secure any decorative items on top of or near the TV stand — heavy ornaments, ceramic vases, and bookends all become projectiles under seismic acceleration.
Identifying Danger Zones in Your Home
Every room in a Japanese home has specific vulnerability patterns during an earthquake. A room-by-room walkthrough — conducted methodically before an earthquake occurs — is one of the most practical steps you can take. Stand at the door of each room and ask: “If this room shook violently for 60 seconds, what would fall, shatter, block an exit, or cause a fire?”
Living Room
- Unsecured TV and AV unit
- Tall display shelves
- Ceiling light fittings
- Glass coffee table tops
- Picture frames above seating
Kitchen
- Refrigerator blocking exit
- Open-shelf dishware
- Gas stove ignition risk
- Overhead cabinet contents
- Microwave on countertop
Bedroom
- Wardrobe / tansu near bed
- Bedside lamps
- Books on high shelves
- Mirror or vanity unit
- Overhead storage boxes
Study / Office
- Tall bookshelves
- Desktop monitor
- Filing cabinet
- Stacked document trays
- Printer on high shelf
Bathroom
- Medicine cabinet glass door
- Shampoo bottles at head height
- Water heater unit
- Slippery floor when wet
- Ceramic fixtures cracking
Hallway / Genkan
- Shoe cabinet blocking exit
- Umbrella stand
- Wall-mounted mirror
- Boxes above head height
- Key hooks near door frame
After completing your walkthrough, create a priority list: address the three highest-risk items in each room within two weeks. Even partial mitigation — securing the tallest unit in each room — yields a significant reduction in risk.
DIY Shelf Anchoring Kit: What You'll Need
All of the following items are readily available at major Japanese home centers such as Cainz (カインズ), Konan (コーナン), or Joyful Honda, as well as on Amazon Japan and Rakuten. The total cost for a standard two-room anchoring project typically runs between ¥4,000 and ¥12,000 depending on the number of units and bracket quality.
| Item | Purpose | Approx. Cost | Notes |
|---|---|---|---|
| Electronic stud finder | Locate wall studs before drilling | ¥2,000–¥4,500 | Essential; reusable for future projects |
| L-brackets (steel, 75 mm) | Anchor tall shelving units to wall studs | ¥300–¥800 each | Buy 2–4 per tall unit; 3 mm thickness minimum |
| Wood screws (65 mm, pan head) | Fix brackets to studs and furniture | ¥400–¥700 per pack | Pack of 30–50; use flat washers |
| Anti-quake gel pads (職振マット) | Prevent sliding of appliances and AV equipment | ¥600–¥1,500 per set | Available in A4 sheet or pre-cut pad form |
| Refrigerator belt strap | Prevent refrigerator from toppling forward | ¥1,500–¥3,000 | Confirm strap load rating exceeds fridge weight |
| TV anti-topple strap | Secure flat-screen to stand or wall anchor | ¥800–¥2,000 | Compatible with VESA mounting holes on most TVs |
| Cordless drill / driver | Drive screws into wood studs and furniture panels | ¥3,500–¥15,000 | An entry-level 10.8V model is sufficient |
| Drill bit set (3–8 mm) | Pilot holes in wood and plasterboard | ¥600–¥1,500 | Include a masonry bit if walls are concrete |
| Pencil and measuring tape | Mark stud positions and bracket placement | ¥200–¥500 | Use a spirit level for horizontal alignment |
| Safety glasses | Protect eyes during drilling | ¥300–¥800 | Non-negotiable when drilling overhead |
Fire Prevention After Earthquakes
The 1923 Great Kanto Earthquake killed over 100,000 people — the majority from firestorms that swept Tokyo and Yokohama after the initial shaking. The 1995 Hanshin-Awaji Earthquake and 2011 Great East Japan Earthquake both triggered numerous post-seismic fires from ruptured gas lines, overturned cooking appliances, and short-circuiting electrical systems. Understanding and preparing for fire risk is an inseparable part of earthquake readiness.
Automatic Gas Shutoff Valves
Modern gas meters in Japan (マイコンメーター) have built-in automatic shutoff systems that trigger at seismic intensity 5 or higher on the Japanese scale. However, older installations and some LP gas setups may not have this feature. Confirm with your gas supplier whether your meter includes automatic shutoff — and if not, ask about an upgrade or manual shutoff procedure.
- Know the location of your gas meter and manual shutoff valve before any emergency.
- Practice the shutoff procedure with every household member old enough to do so.
- After a major earthquake, do not use gas appliances until the supplier confirms the line is undamaged — even if the automatic shutoff did not trigger.
- Install a gas leak detector (ガス ₸れ警報器) near the floor in the kitchen — many LP gases are heavier than air and accumulate at ground level.
- Never use candles, cigarette lighters, or match flames near a gas-affected area.
Protecting Against Cooking Fire Hazards
One of the most overlooked fire risks is the stove: oil left on a burner during an earthquake can ignite if the flame is knocked sideways or the pan tips. Secure your stove with anti-slip feet or a dedicated kitchen anchor kit. Consider fitting an automatic stove shutoff sensor (自動消火装置) that detects overheating and cuts the gas supply.
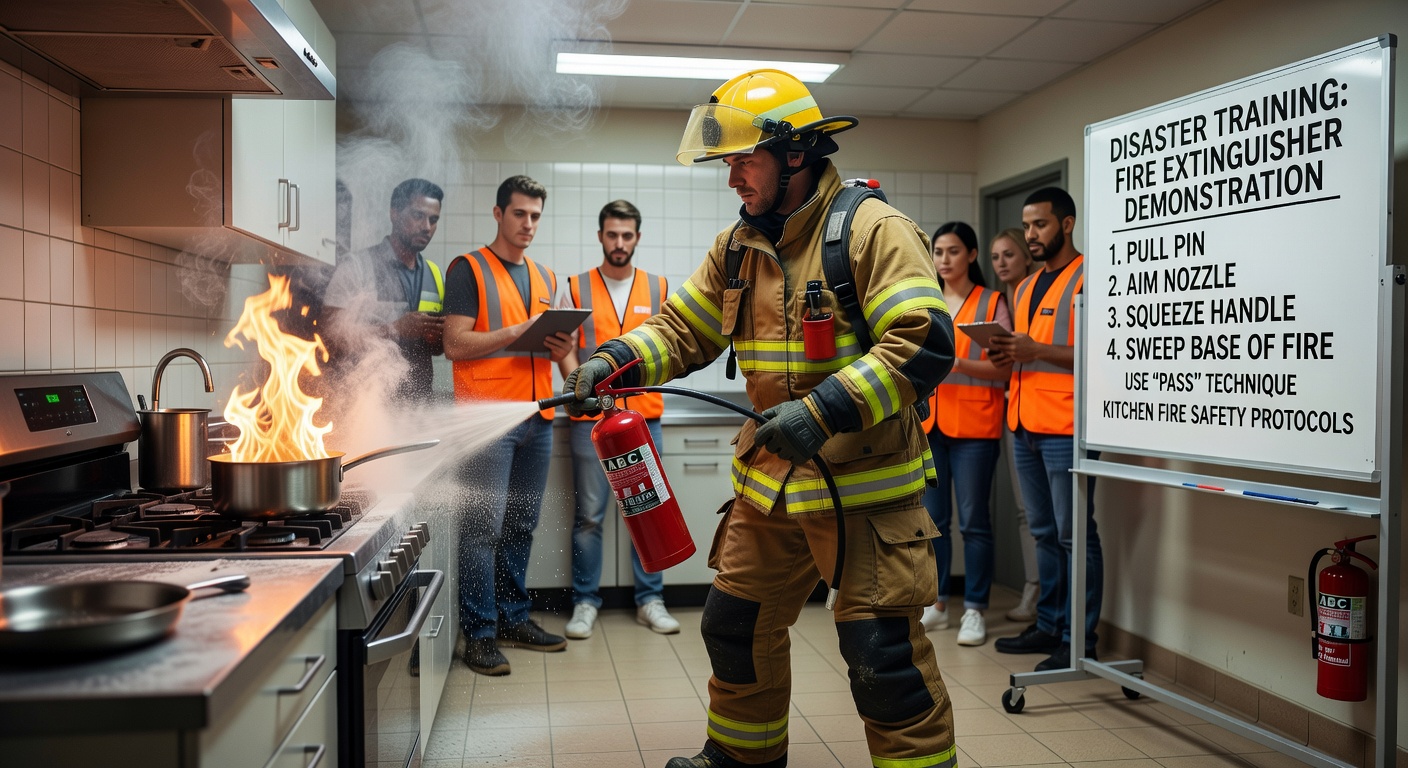
How to Use a Fire Extinguisher (PASS Method)
A portable dry-powder or CO₂ fire extinguisher is standard equipment in well-prepared Japanese homes — and every household member should know how to use one before they ever face an actual fire. The PASS method is a four-step process endorsed by Japan's fire departments and civil defense organizations nationwide.
Before applying PASS, confirm these conditions: the fire is small (approximately bin-sized or smaller), you have a clear escape route behind you, you have already called 119 (fire emergency), and all household members have been notified to evacuate.
After discharging a fire extinguisher — even partially — have it recharged or replaced immediately. A partially discharged extinguisher may appear ready to use but will fail when needed. Powder extinguishers should be inverted and shaken every six months to prevent the powder from compacting and caking inside the cylinder.
Summary Checklist
Use this checklist to track your earthquake-proofing progress at home.
- All bookshelves and storage units taller than 120 cm anchored to wall studs with L-brackets.
- Refrigerator secured with belt strap and anti-quake pads fitted under all feet.
- Flat-screen television and AV stand secured with anti-topple strap.
- Room-by-room danger zone walkthrough completed and priority list created.
- Anti-quake gel pads placed under audio equipment, microwaves, and countertop appliances.
- Gas meter shutoff location confirmed and shutoff procedure practiced with all household members.
- Gas leak detector installed in kitchen, within 30 cm of floor level.
- Fire extinguisher present, fully charged, within expiry date, and accessible without obstruction.
- All household members instructed on PASS method and the extinguisher's storage location.
- Sleeping area furniture secured as first priority.
- Hallway and all exit routes clear of tall furniture that could block egress after a quake.