Japan experiences some of the most intense typhoon seasons in the world. From late summer through autumn, tropical storms roll in off the Pacific and East China Sea, delivering torrential rain to mountainous terrain where rivers rise with alarming speed. Low-lying residential areas, river-adjacent neighborhoods, and coastal towns from Kyushu to the Kanto plain face recurring flood risk every year. The 2019 Typhoon Hagibis event — which triggered floods and landslides across more than 13 prefectures — was a vivid reminder that flood damage can strike communities that believed themselves safe.
River flooding is the most common flood type in Japan, compounded by the country's steep, short river systems that funnel water rapidly into valleys and plains. Urban flooding from overwhelmed drainage is also on the rise as cities expand and impermeable surfaces replace soil. For homeowners and renters alike, taking practical steps before a storm arrives can be the difference between a clean home and thousands of yen in repairs — or worse, a safety emergency.
This guide walks you through the most effective DIY flood defenses: how to fill and stack sandbags, alternatives to traditional sandbags, methods for sealing doors and windows, and the installation of storm shutters. We also cover a 24-hour pre-flood action checklist and safe cleanup steps after floodwaters recede.
How to Fill and Stack Sandbags Correctly
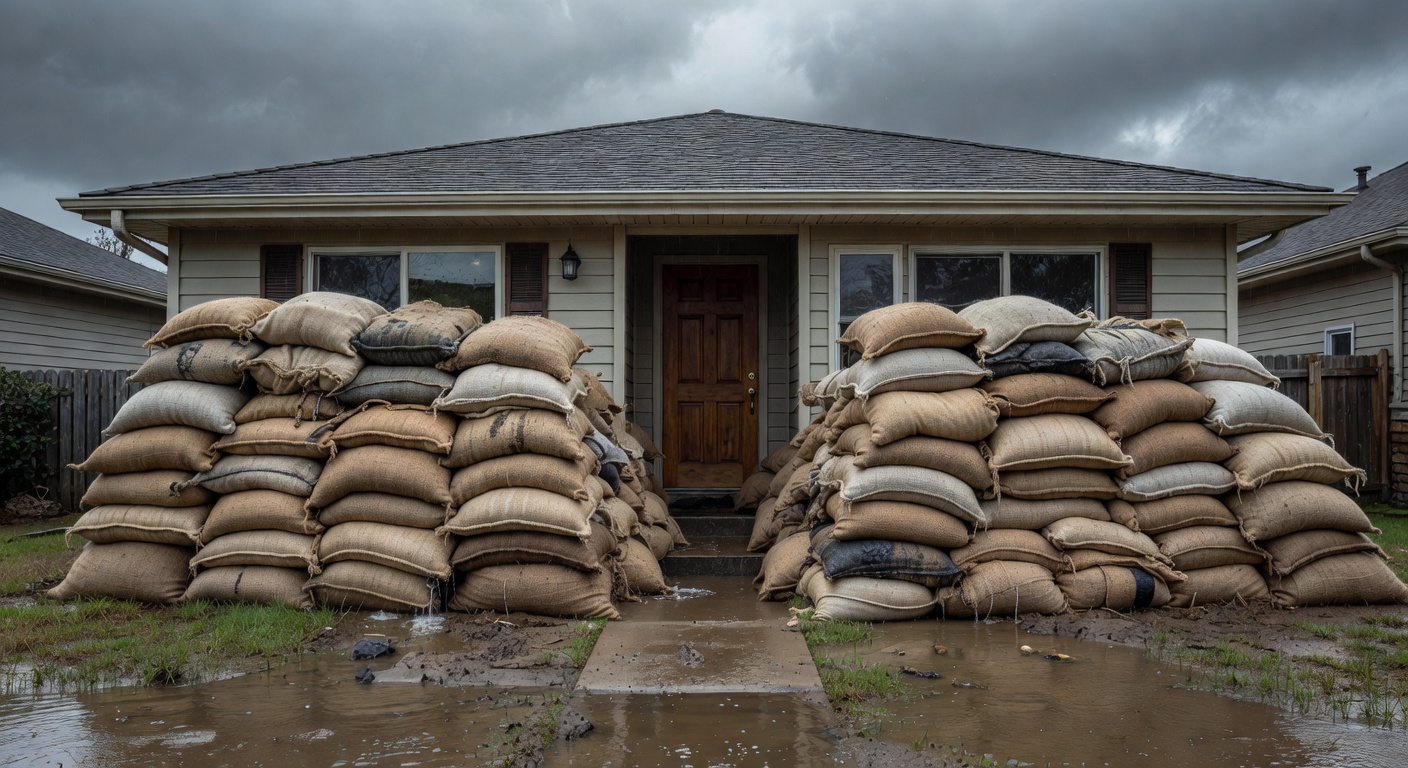
The humble sandbag remains the most widely available and cost-effective flood barrier for homeowners. A sandbag filled and placed correctly can hold back 15–30 cm of water per row. Done incorrectly, gaps and over-filling render them nearly useless. Follow these steps precisely.
- Gather materials before the storm
You will need: woven polypropylene sandbags (available at home centers and hardware stores throughout Japan), dry or slightly moist sand or soil, a flat-bladed spade, work gloves, and a plastic tarpaulin. Do not wait until the typhoon warning is issued — bags and sand sell out quickly. Pre-purchase enough bags for at least two layers around each vulnerable entry point.
- Fill bags no more than half to two-thirds full
Over-filled bags are rigid, leave gaps between rows, and are very difficult to carry safely. A half-to-two-thirds fill creates a bag that weighs around 15–20 kg and is pliable enough to conform to the ground and to adjacent bags. Use clean sand or earth; avoid gravel, as it creates channels for water to seep through.
- Fold and tuck the open end — do not tie
Rather than knotting the bag shut (which creates a rigid rounded end), fold the open end under the bag when placing it. This self-sealing method keeps the bag flat and ensures the fold is pressed tight by the weight of bags above. Tying leads to pointed ends that create voids in your wall.
- Lay the first row perpendicular to the flow direction
Place the first layer of bags lengthwise across the anticipated flow of water — i.e., the long axis of each bag faces toward the water. Tamp each bag firmly into the ground and against its neighbor. Use the heel of your boot to press out air gaps. Before laying additional rows, unroll a sheet of plastic tarpaulin against the water-facing side of the wall — this is your primary water seal.
- Stack in a pyramid with staggered joints
Place the second row with each bag centered over the joint between two bags below — like bricklaying. Each successive row should be set back slightly toward the dry side, creating a stable pyramidal profile. A single-row-high wall offers minimal protection; aim for three rows minimum for meaningful flood defense. A three-row pyramid can hold back approximately 45–60 cm of water when properly sealed.
- Secure the plastic sheeting and check for gaps
Pull the tarpaulin up the water-facing side and over the top of the wall. Weight the top edge with additional bags. Check both ends of the barrier where it meets walls or other structures — these corner joints are the most common failure points. Pack additional bags tightly into these corners. If the tarpaulin is not long enough to cover the full height, overlap two sheets by at least 30 cm and tape the seam with waterproof duct tape.
- After the flood: bag disposal
Used sandbags that have been in contact with floodwater may be contaminated with sewage bacteria, chemicals, or heavy metals. Do not simply dump sand into drains. Check your local municipality's guidelines — most Japanese cities and towns have specific collection days for flood debris. Wear heavy gloves and a mask when handling used bags. Never reuse bags that contacted floodwater for garden applications.
DIY Sandbag Alternatives
Traditional sandbags require storage space and advance planning. A growing range of alternatives can be stored flat and deployed in minutes — an important advantage when a typhoon warning is issued with only hours of notice.
Water-Absorbing Flood Bags
Modern superabsorbent polymer (SAP) bags are stored completely flat and expand to full sand-bag weight when submerged in water for 3–5 minutes. A box of 10 bags that takes up minimal cupboard space can inflate into a usable barrier in under 10 minutes. Brands such as AquaDam, HydraBarrier, and domestic equivalents are available online and at major home centers. They are reusable after drying if not contaminated, and significantly lighter to transport before deployment.
- Store flat — no sand stockpile needed
- Fill using a garden hose or bucket; no sand or soil required
- Each bag absorbs 15–20 L of water and can hold its weight for 3–5 days
- Stack and seal exactly like traditional sandbags
- Deflate and dry for reuse after non-contaminated flooding
Heavy-Duty Plastic Sheeting Barriers
For wide openings such as garage doors and ground-floor windows, a sheet of 0.2 mm (200 micron) or thicker polythene film, secured at top and weighted at the base with sandbags, can redirect shallow surface flow. This method works best as a supplement to sandbags, not a replacement. Use double-sided waterproof tape or silicone sealant to fix the sheeting at the base and sides before weighting it.
Commercial Flood Boards and Door Barriers
Pre-fabricated flood boards — rigid aluminum or composite panels with rubber edge seals — are designed to slot into purpose-installed brackets on door frames. They are the most watertight DIY solution available and can withstand significantly more pressure than sandbags. Major Japanese manufacturers and importers offer single-door kits ranging from ¥15,000 to ¥80,000. The key advantage is repeatability: a good flood board can be installed and removed in under five minutes and will perform reliably for 10+ years.
- Measure your door frame width and flood depth requirement before ordering
- Install the bracket channels into the door frame using appropriate anchors — this is done once, well before typhoon season
- Store the boards nearby (inside a hall closet or garage) for rapid deployment
- Inspect rubber seals annually and replace if cracked or compressed
Protecting Doors and Windows
Doors and windows — particularly at ground level — are the primary ingress points for floodwater. Even a well-built modern Japanese house will have gaps of 2–5 mm under external doors. In a significant flood event, water pressure against these gaps can drive surprising volumes inside within minutes.
Door Sealing Techniques
For outward-opening doors, apply a closed-cell foam weatherstrip (not the cheap open-cell foam sold for draft exclusion, which absorbs water) along the full perimeter of the door frame. Reinforce the threshold with a door-bottom draft excluder rated for water resistance. Then pack sandbags or a water-absorbing barrier on the exterior side.
For inward-opening doors, the strategy is inverted: the door itself acts as your barrier, so sealing the frame perimeter and threshold is critical. Apply silicone caulk to any gaps between the door frame and the wall. Use hydraulic cement to fill any cracks in the floor at the threshold. A towel or draft snake can absorb minor seepage but is not adequate for true flooding — physical barriers must be in place.
- Use self-adhesive closed-cell EPDM foam strips on door frames — these compress fully under door pressure and do not absorb water
- A rubber door bottom sweep provides a tighter seal than fabric excluders
- Exterior silicone caulk applied along the base and sides of door frames prevents water tracking along the wall-frame joint
- For older sliding Japanese doors (引き戸), seal the lower track channel with foam backer rod and silicone before placing external barriers
Window Sealing
Standard double-glazed windows in modern Japanese construction are relatively watertight at the glass-to-frame joint, but the frame-to-wall joint and window weep holes (small drainage slots in the sill) can allow water ingress under flood conditions. Temporarily tape over weep holes from the inside using waterproof tape, and apply foam weatherstrip to the inside of window frames. For basement or below-grade windows, consider purpose-built window well flood guards — semi-circular barriers that sit over the window well and divert surface water away.
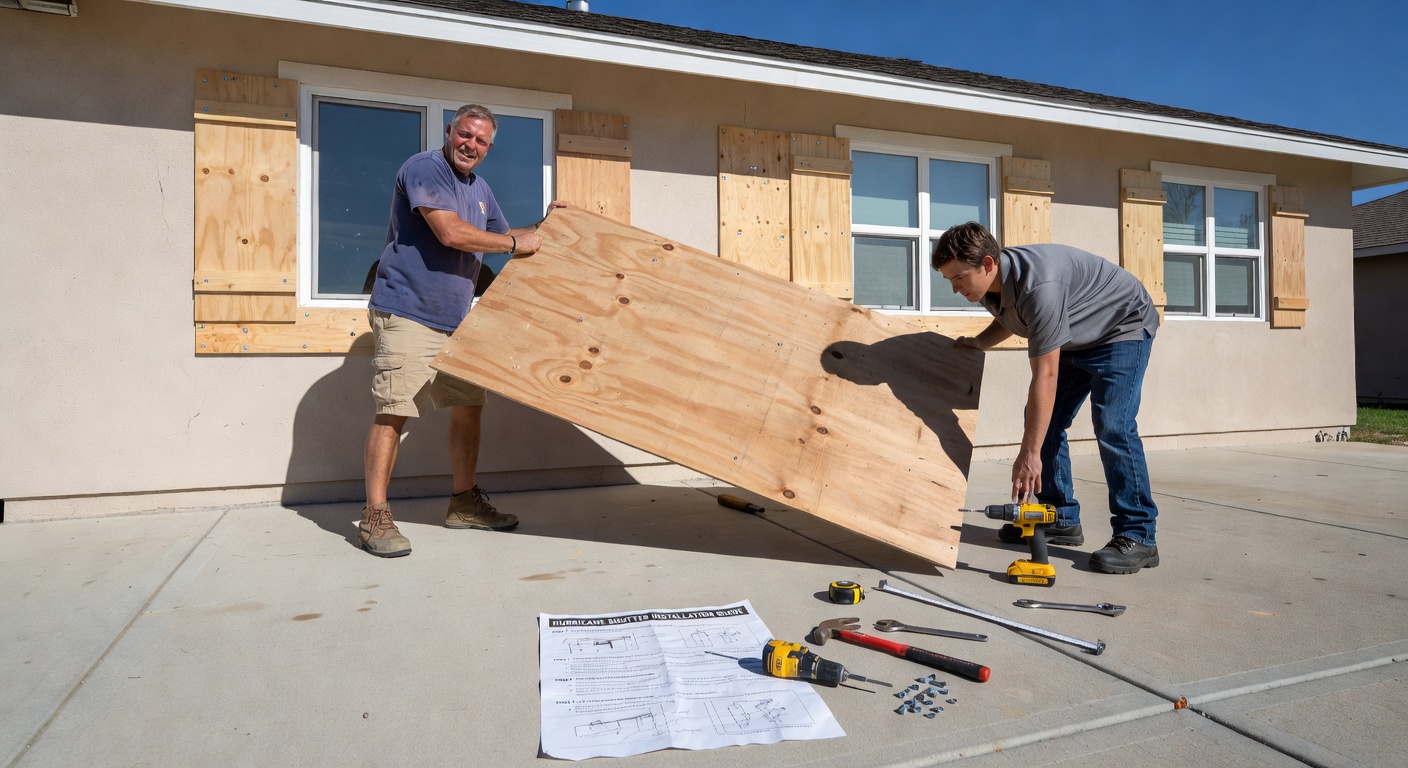
Installing Window Shutters and Covers for Typhoon Season
Japan's built-in amado (雨戸) — traditional wooden or aluminum rain shutters — provide a first layer of protection, but many modern homes lack them, and older shutter systems may not meet current wind resistance requirements. Installing supplementary storm shutters or plywood covers significantly reduces the risk of window failure from wind-driven rain and flying debris, both of which can rapidly lead to interior flooding.
- Assess your windows and select the right shutter system
Measure each window: width, height, and the available wall depth around the frame for bracket mounting. Choose between roll-down (fixed track), accordion (hinged panels that fold to one side), and removable panel systems. For rental properties where permanent installation is not possible, plywood panel covers with suction-cup or strap-around mounts are available. For owned properties, aluminum accordion shutters offer the best balance of protection and convenience.
- Source materials and check structural wall composition
Confirm what your exterior walls are made of before drilling: reinforced concrete (RC) requires masonry anchors; wooden-frame walls require lag bolts into studs. Use a stud finder or consult your building's design documents. Brackets anchored into exterior cladding only — not the structural frame — will pull out under typhoon wind loads. For DIY plywood covers, use a minimum of 12 mm (half-inch) marine or exterior-grade plywood.
- Mark and pre-drill bracket positions
Hold the bracket against the wall at the marked position and use a pencil to mark each fixing hole. For wooden-frame walls, each bracket should engage at least two studs. Drill pilot holes slightly narrower than your chosen anchor diameter. Use a vacuum or tape flag to catch dust — especially important when drilling into RC walls where dust can obscure structural rebar positions.
- Install anchors and mount the brackets
Drive masonry anchors flush into RC walls before inserting bolts; in wooden frames, use 90 mm or longer lag screws directly into studs. Torque bracket bolts to the manufacturer's specification — under-tightening is a common cause of shutter failure. Apply a bead of exterior silicone around each bracket base to prevent water tracking into the wall cavity through the drill holes.
- Hang and test the shutters before typhoon season
Do not wait until a storm warning is issued to discover that a shutter track is misaligned or a panel hinge is stiff. Install and test each shutter in late spring, before the June-July rainy season (梅雨). Confirm that panels close fully, latches engage securely, and the shutter sits tight against the window frame perimeter. Lubricate all moving parts with a silicone-based spray — do not use oil-based lubricants, which attract dust and degrade rubber seals.
- Seal the perimeter when closed
Even a well-fitted shutter will have minor gaps at the edges. Apply a removable foam weatherstrip to the window frame so that it compresses against the inside face of the closed shutter. This prevents wind-driven rain from tracking around the shutter edge and reaching the window glass or frame seal. For plywood covers, apply closed-cell foam tape to the plywood edges before securing it in position.
- Annual maintenance checks
Each spring, inspect all bracket bolts for corrosion and re-torque if necessary. Check rubber seals for cracking or permanent compression set — replace any seal that no longer springs back to its original profile when uncompressed. Sand and re-paint or re-coat any areas of plywood that show surface delamination. A 30-minute annual check prevents expensive failure during an actual event.
Before investing in any flood defense measures, check your property's official flood risk rating on Japan's national hazard map portal. The government's 国土交通省 ハザードマップポータルサイト (disaportal.gsi.go.jp) allows you to enter any address in Japan and view flood inundation depth predictions for river floods, storm surge, and tsunamis. Your municipality's city hall (市役所) also distributes printed hazard map booklets — request one at the general affairs counter (総務課). Understanding your specific risk zone shapes every preparation decision: a property rated for 0.5 m of inundation needs different defenses than one rated for 3 m.
Pre-Flood Checklist: What to Do 24 Hours Before
When a typhoon or heavy rain special warning (大雨特別警報) is forecast, the clock starts. The following checklist covers the critical actions in roughly priority order. Print and post this in your home.
- Check evacuation orders and your local hazard map zone. Know whether your area is under advisory (避難準備), warning (避難勧告), or mandatory order (避難指示). If a mandatory order is issued, leave immediately — no physical preparation replaces evacuation when authorities deem it necessary.
- Move valuables, documents, and electronics to the highest floor. Passports, insurance documents, bank books (通帳), external hard drives, and irreplaceable items should be placed well above the predicted inundation level. Use waterproof bags or sealed plastic storage boxes.
- Deploy sandbags or flood boards at all ground-level doors. Prioritize the front entrance, back door, and garage if applicable. Aim to have barriers in place at least 3 hours before predicted landfall or peak rainfall.
- Seal door frames and window sills with weatherstrip or towels. As a secondary measure after physical barriers, stuff rolled towels into door thresholds from the inside and apply tape over weep holes in window sills. Every centimetre of sealing counts.
- Close and latch all storm shutters (雨戸). Ensure every ground-floor and first-floor window shutter is fully closed and latched. Check that accordion-style shutters are secured at both top and bottom latches.
- Turn off electricity at the breaker box if flooding is likely below floor level. Electrical outlets and floor-level wiring can cause electrocution in floodwater. If inundation above the socket height is predicted, shut the main circuit breaker. Keep a torch (flashlight) accessible.
- Disconnect and raise washing machines, dryers, and refrigerators. Ground-floor appliances are prime flood damage items. Even raising them 10–15 cm on wooden blocks can mean the difference between salvage and write-off in a minor flood.
- Fill the bathtub with water. Flooding often disrupts water supply for hours or days afterward. A full 200 L bathtub provides a critical supply for flushing toilets and basic sanitation when tap water is unavailable.
- Charge all mobile devices and power banks. Ensure phones, tablets, emergency radios, and any portable power banks are at 100% charge. Download offline maps and prefectural disaster apps if not already installed.
- Prepare your emergency go-bag. A pre-packed bag (非常用持ち出し袋) should be placed near the exit, containing water, food, first aid, document copies, cash, and medications. See our Emergency Kit DIY guide for full contents.
- Secure or bring inside all outdoor items. Potted plants, bicycles, outdoor furniture, garden tools, and anything not bolted down becomes dangerous airborne debris in typhoon winds. Move everything into a garage or interior room.
- Notify family members of your plan and check-in schedule. Agree on a communication plan: a check-in time, an out-of-area contact who can relay messages, and a meeting point if you are separated. Register with your local emergency notification system (防災メール) if not already enrolled.
Floodwater is extraordinarily dangerous and its hazards are frequently underestimated. Even 15 cm of fast-moving water can knock an adult off their feet. Just 30 cm of water can sweep away a small vehicle. Floodwater in urban areas invariably contains:
- Raw sewage and pathogenic bacteria (E. coli, Leptospira, and others)
- Submerged obstacles including open manholes, drainage grates, and debris
- Live electrical hazards from downed power lines and flooded outlets
- Chemical contamination from ruptured underground fuel storage
- Hidden currents that bear no relation to surface appearance
If you must move through a flooded area on foot, use a long pole to probe the ground ahead with each step. Never enter fast-moving water above shin height. If your vehicle stalls in floodwater, abandon it immediately and move to higher ground — do not wait inside. A car can be replaced; you cannot.
After the Flood: Safe Cleanup Steps
Once floodwaters have fully receded and official all-clear notifications have been issued, the cleanup phase begins. Flood cleanup carries its own serious hazards: structural damage, contamination, mold, and electrical risks all demand careful, systematic assessment before any restoration work begins.
- Wait for official all-clear before re-entering. Do not return to your home until local authorities confirm it is safe to do so. Floodwaters can recede quickly but leave behind unstable ground, undermined foundations, and hazardous debris.
- Have a licensed electrician inspect before restoring power. Never switch on the main breaker in a flood-affected property without professional inspection. Water in electrical panels, outlets, or under flooring creates electrocution and fire risk that is not always visible.
- Wear full protective equipment throughout cleanup. At minimum: rubber boots (knee height), heavy rubber gloves, N95 mask or better, and eye protection. Floodwater contamination remains in sediment, on surfaces, and in the air as it dries. Long sleeves and waterproof clothing are advisable.
- Document all damage thoroughly before cleaning. Photograph and video every affected room, item, and structural element before removing anything. Your insurance claim and any government disaster assistance application (罹災証明書) will require comprehensive documentation.
- Remove standing water and saturated materials within 24–48 hours. Mold growth in Japan's humid climate begins within 24–48 hours of water damage. Wet tatami, drywall (石膏ボード), insulation, and carpet padding must be removed quickly. Hardwood flooring may be salvageable if dried rapidly with dehumidifiers and fans.
- Disinfect all flood-contacted surfaces. Use a diluted bleach solution (1 part household bleach to 10 parts water) on hard non-porous surfaces. Commercial disinfectants certified against E. coli and Salmonella are appropriate for floors, walls, and countertops. Do not mix bleach with other cleaning products.
- Check structural integrity before re-occupying. Inspect foundations, load-bearing walls, and the underfloor space (床下) for undermining, cracking, or significant sediment deposits. If in doubt, request inspection by a licensed building inspector (建築士) before sleeping in the property.
- Apply to the municipality for a disaster damage certificate (罹災証明書). This official document is required to access government disaster relief funds, tax reductions, and low-interest reconstruction loans. Apply to your city or ward office as soon as possible after the event — deadlines are strictly enforced.