Emergency Shelter & Warmth: DIY Solutions
緊急避難・保温対策 DIY
When a disaster damages your home or forces you to evacuate, finding shelter and maintaining body warmth become immediate priorities — especially in winter. Japan experiences both extreme summer heat and cold winters, and both pose serious health risks when heating and cooling systems are unavailable.
This guide covers DIY approaches to emergency shelter construction, insulating an existing damaged space, and maintaining safe body temperature using widely available materials. It also addresses heat preparedness, since hyperthermia (heat stroke) is a leading cause of disaster-related deaths in Japan during summer emergencies.
When You May Need Emergency Shelter
- Your home has been structurally damaged by an earthquake and is unsafe to remain in
- A typhoon or flood has made your home uninhabitable
- You are waiting outdoors for an official evacuation shelter to open
- A power outage has made your home dangerously cold in winter or hot in summer
- You are temporarily separated from your evacuation group and need to wait overnight
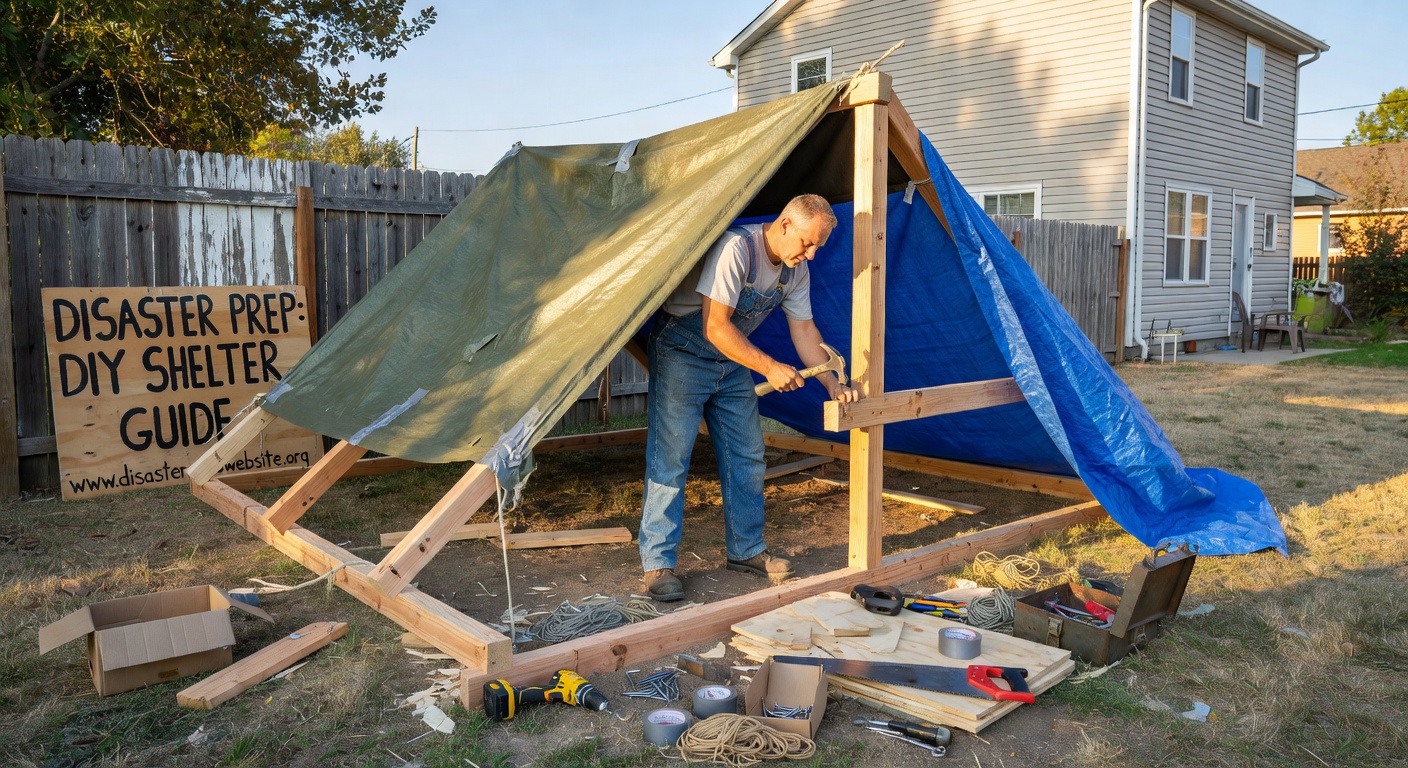
DIY Tarpaulin Shelter: Step-by-Step
A heavy-duty tarpaulin (ブルーシート, burū shīto) is one of Japan's most commonly used and easily available emergency materials. Available at hardware stores (ホームセンター) for ¥1,000–¥3,000, a 3m × 4m tarp can create a basic rain- and wind-resistant shelter for 2–3 people.
- Select a safe, elevated location. Choose a site that is not in a flood zone, at least 2 meters from standing trees (falling hazard), and protected from prevailing wind if possible. Flat ground is preferable but a slight slope away from the shelter is better for drainage.
- Set the ridgeline. Run a length of paracord or rope between two trees or sturdy poles at approximately 1.5–2 meters height. Pull it taut. This forms the spine of your shelter. If using poles, drive them firmly into the ground.
- Drape and secure the tarp. Lay the tarp over the ridgeline so it creates an A-frame shape. Secure the peak to the ridgeline with cords through the tarp's grommets. Pull each corner and side out and down, staking or tying them firmly to create a taut surface that sheds rain.
- Seal the ends. If wind direction is known, fold and stake the upwind end closed. Leave a small opening at the downwind end for ventilation. Folding the tarp edge under creates a better seal.
- Insulate the floor. Place folded cardboard, a yoga mat, a sleeping bag, or multiple layers of newspaper between the ground and your body. Cold ground conducts heat away from the body rapidly — floor insulation is as important as overhead shelter.
- Mark the shelter location. If rescue workers may be searching for you, mark your shelter with a bright-colored item or a reflective material visible from a distance. A whistle signal (3 short blasts) is the international distress signal.
Emergency Thermal Blankets: How to Use Them
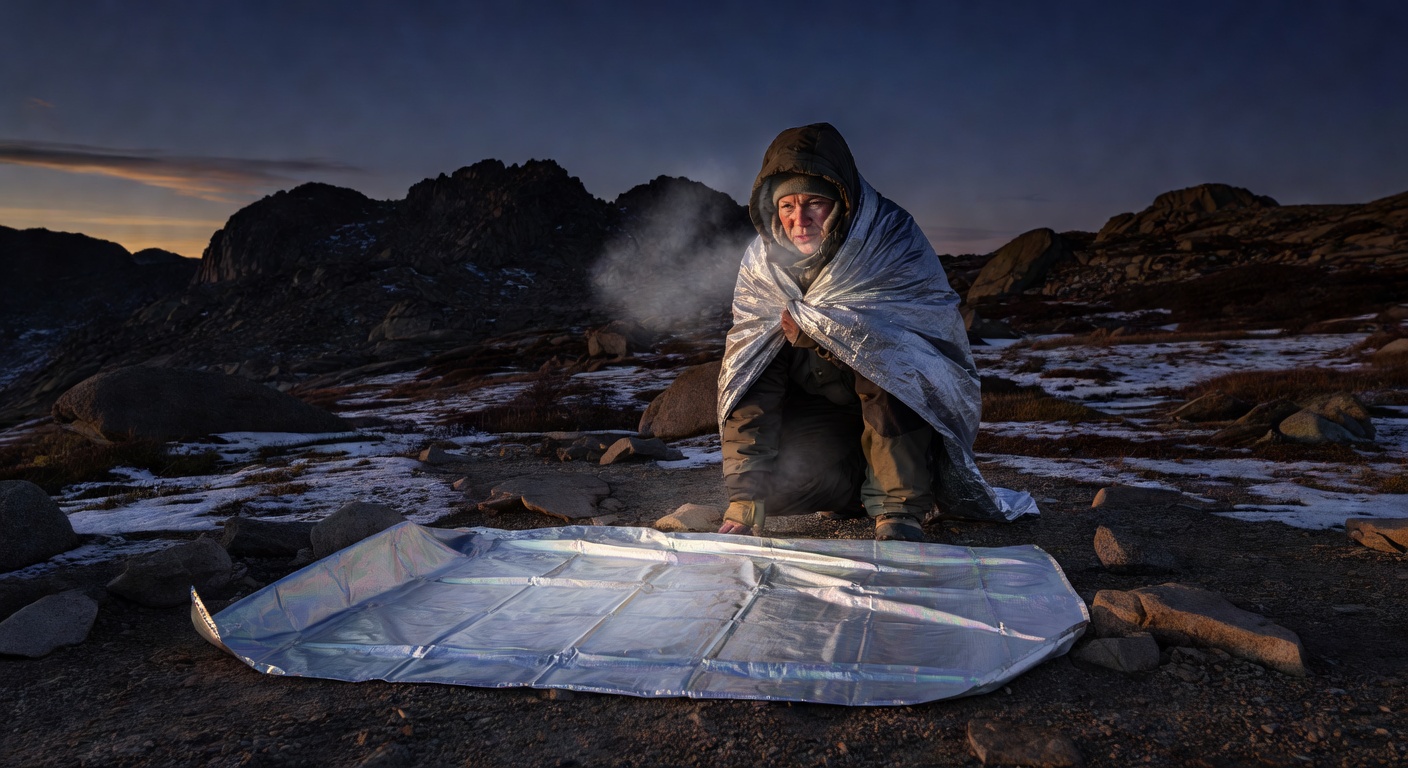
Mylar emergency blankets (アルミシート, arumi shīto) are one of the most valuable and overlooked items in an emergency kit. They weigh under 60 grams, cost less than ¥300, and reflect up to 90% of radiated body heat back toward the user. Keep at least 2–3 per household member in your go-bag.
Using a Thermal Blanket for Warmth
- Wrap the shiny side inward to reflect body heat back
- Cover the head and shoulders — most heat loss occurs there
- Tuck the blanket under the body to block cold ground
- Layer over a regular blanket for best effect
- Two people sharing a blanket share more heat — useful for children or elderly
Using a Thermal Blanket for Shade (Heat)
- Use the shiny side outward to reflect sunlight away
- Suspend over a rest area as a sun shade
- Reduces radiant heat load significantly in direct sun
- Pair with a manual fan and water for heat management
- Keep one in your car emergency kit for summer breakdowns
Advertisement space — 728 × 90
Insulating a Damaged Indoor Space
If your home is damaged but not structurally unsafe to remain in (e.g., broken windows, missing doors), you can significantly improve indoor conditions with basic materials.
- Block broken windows. Use heavy-duty tape and large sheets of cardboard, plastic sheeting, or tarps to cover open windows. This dramatically reduces wind chill and heat loss.
- Consolidate to one room. A single room is far easier to keep warm than an entire apartment. Choose an interior room (fewer exterior walls = less heat loss). Close all other room doors.
- Lay down insulation. Cover the floor with blankets, tatami mats, yoga mats, or folded newspaper. Carpet is a significant insulator — if you have rugs, bring them to your shelter room.
- Create a tent within the room. Hang blankets or sheets from ceiling hooks or furniture to create a smaller inner space. Body heat from 2–3 people in a small tent-like enclosure raises temperature considerably.
Never Use Charcoal or Gas Appliances Indoors for Heating
Using charcoal braziers (七輪, shichirin), portable kerosene heaters without proper ventilation, or gas stoves to heat an enclosed space can cause fatal carbon monoxide poisoning. If you must use a kerosene heater, keep a window cracked open at all times and never sleep with it running.
Heat Emergency: Staying Cool Without Power
Japan's summer temperatures regularly exceed 35°C, and heat stroke (熱中症, netchūshō) kills hundreds of people each year. During a summer power outage, cooling becomes as urgent as warmth in winter.
- Move to the lowest floor or a basement area — cooler air sinks
- Hang damp sheets or towels over windows on the sunny side of the building
- Use a battery-powered fan with damp cloths over the face and wrists
- Drink water regularly — do not wait until you feel thirsty
- Avoid activity during 10:00–15:00 (peak heat hours)
- Identify your nearest public cooling shelter (涼み処, suzumidokoro) — convenience stores, community centers, and libraries often serve this role
- Check on elderly neighbors during summer outages — they are most vulnerable to heat stroke
Stock Cooling Items in Your Emergency Kit
Add the following heat-mitigation items to your summer emergency kit: at least one battery-powered hand fan, cooling towels (wet and reactivate by waving), oral rehydration salts (ORS), and an insulated water bottle. These items weigh almost nothing but are valuable in a summer emergency.