When a major earthquake strikes, a typhoon makes landfall, or a severe weather event isolates your neighborhood, the gap between being comfortable and suffering begins with one question: do you have enough food and water at home? Japan's Cabinet Office and the Tokyo Metropolitan Government both recommend that every household maintain a minimum of three days' worth of emergency food and water, and increasingly, experts advise pushing that target to a full seven days. The Great East Japan Earthquake of 2011 demonstrated that supply chains and infrastructure can remain disrupted for far longer than three days; residents in affected areas waited weeks for regular supplies to resume.
The good news is that building a practical, well-organized food and water reserve does not require a dedicated storage room or a large budget. With a methodical approach — focusing on shelf-stable foods, proper water storage, and smart rotation practices — any household, including those in compact Tokyo apartments, can achieve meaningful preparedness. This guide walks you through every step, from calculating how much water your family needs to constructing an efficient canned-goods rotation system that wastes nothing.
How Much Water Do You Need?
Water is your single most critical emergency supply. The human body can survive for weeks without food but only a few days without water — and that window shortens dramatically under physical stress, high temperatures, or if anyone in your household is very young, elderly, or unwell. The standard guideline is 2 liters of drinking water per person per day, but real-world needs are higher once you account for cooking, basic hygiene, and oral care.
Choosing the Right Water Storage Containers
Commercial bottled mineral water is the most convenient starting point. In Japan, 2-liter PET bottles are widely available at supermarkets and convenience stores at low cost; larger 4-liter and 9-liter bottles (sold at home centers like Cainz and Konan) offer better value per liter and take up less shelf space relative to their volume. When selecting bottles, opt for those with the latest printed expiry date and store them away from direct sunlight and heat sources.
For bulk water storage beyond commercially bottled supplies, consider food-grade polyethylene water containers with airtight screw-top lids. Dedicated water storage tanks in the 20-liter to 100-liter range are available online (Amazon Japan, Rakuten) and at outdoor gear shops. If you fill these yourself from tap water, the water should be replaced every 3 to 6 months, as tap water's chlorine content dissipates over time. Label each container with the fill date using a waterproof marker.
Avoid using repurposed juice bottles or other food-grade containers that previously held flavored drinks — residual sugars encourage bacterial growth. Dedicated BPA-free water containers designed for emergency storage are the safest choice.
Storing Water in a Small Home
In most Tokyo and urban Japanese apartments, dedicated storage space is scarce. Consider these locations: under the kitchen sink (avoid direct contact with floor moisture), in a hallway closet near the front door (useful if you need to grab supplies quickly for evacuation), beneath beds using low-profile stackable crates, and in the tokonoma or unused corner of a Western-style room. Prioritize cool, dark locations — a south-facing balcony in direct sun is not suitable. A consistent temperature between 15°C and 25°C is ideal for extending shelf life.
DIY Water Purification Methods
Even with a stored water supply, emergencies may arise where your reserves run out or become contaminated. Knowing how to purify water from alternative sources — a building's emergency tank, a nearby river, or collected rainwater — is a vital backup skill. The following methods range from the simplest and most reliable to more advanced techniques suitable for longer-duration emergencies.

Method 1 — Boiling
Boiling is the gold standard for killing bacteria, viruses, and parasites. Bring water to a rolling boil for at least one full minute; at elevations above 2,000 meters (not typical in most of Japan), extend this to three minutes. Allow the water to cool in a covered, clean container before drinking. Boiling does not remove chemical contaminants, heavy metals, or dissolved solids, so it works best with clear water from known sources. If the water is turbid or murky, pre-filter it through a clean cloth, cotton wool, or a coffee filter to remove sediment before boiling.
In a power outage, boiling requires a gas stove, portable gas burner (cassette kon-ro), or outdoor camp stove. Keep at least three canisters of butane gas (110g each) in your emergency supplies — they are inexpensive and widely available at 100-yen stores and home centers.
Method 2 — Purification Tablets
Sodium hypochlorite (bleach-based) and sodium dichloroisocyanurate (NaDCC) tablets are compact, lightweight, and effective against most biological contaminants. In Japan, products like Aquatabs and locally branded emergency water tablets are sold at outdoor shops and pharmacy chains including Matsumoto Kiyoshi and Welcia. Follow the manufacturer's dosage instructions precisely — typically one tablet per liter of clear water — and allow 30 minutes of contact time before drinking. For turbid water, double the contact time and pre-filter if possible. Tablets have a long shelf life (typically 3 to 5 years sealed) but degrade once opened; keep them sealed in their original packaging inside your emergency kit.
Method 3 — Household Bleach (Sodium Hypochlorite)
Unscented liquid bleach containing 5–8% sodium hypochlorite can be used for water disinfection if tablets are unavailable. Use approximately 2 drops per liter of clear water (4 drops if the water is murky), stir, and wait 30 minutes. The treated water should have a faint chlorine smell; if it does not, repeat the dosage and wait another 15 minutes. Note that bleach degrades over time — a bottle stored for over a year may have lost significant potency. Always use bleach labeled purely for disinfection, not scented or "splashless" variants, which contain additives unsafe for consumption.
Method 4 — Portable Filtration
For households that camp or hike, a portable hollow-fiber membrane filter (such as the Sawyer Squeeze or Japanese-market equivalents) provides an excellent backup. These devices filter bacteria and protozoa down to 0.1 microns but do not remove viruses. In Japan's post-disaster context — particularly after flooding or infrastructure failure — pairing filtration with chemical treatment or boiling gives the most complete protection. A quality portable filter can process tens of thousands of liters before needing replacement and adds minimal weight to an evacuation bag.
Every container in your water reserve, whether a store-bought bottle or a filled tank, should be labeled with three pieces of information:
- Fill date or "best before" date — written with a permanent marker on masking tape.
- Capacity — so you can track your total reserve at a glance.
- Source — tap water, bottled, or purified from an alternative source.
Check and rotate your water supply every six months. A good habit is to tie rotation to the bi-annual Japanese earthquake drills in March and September.
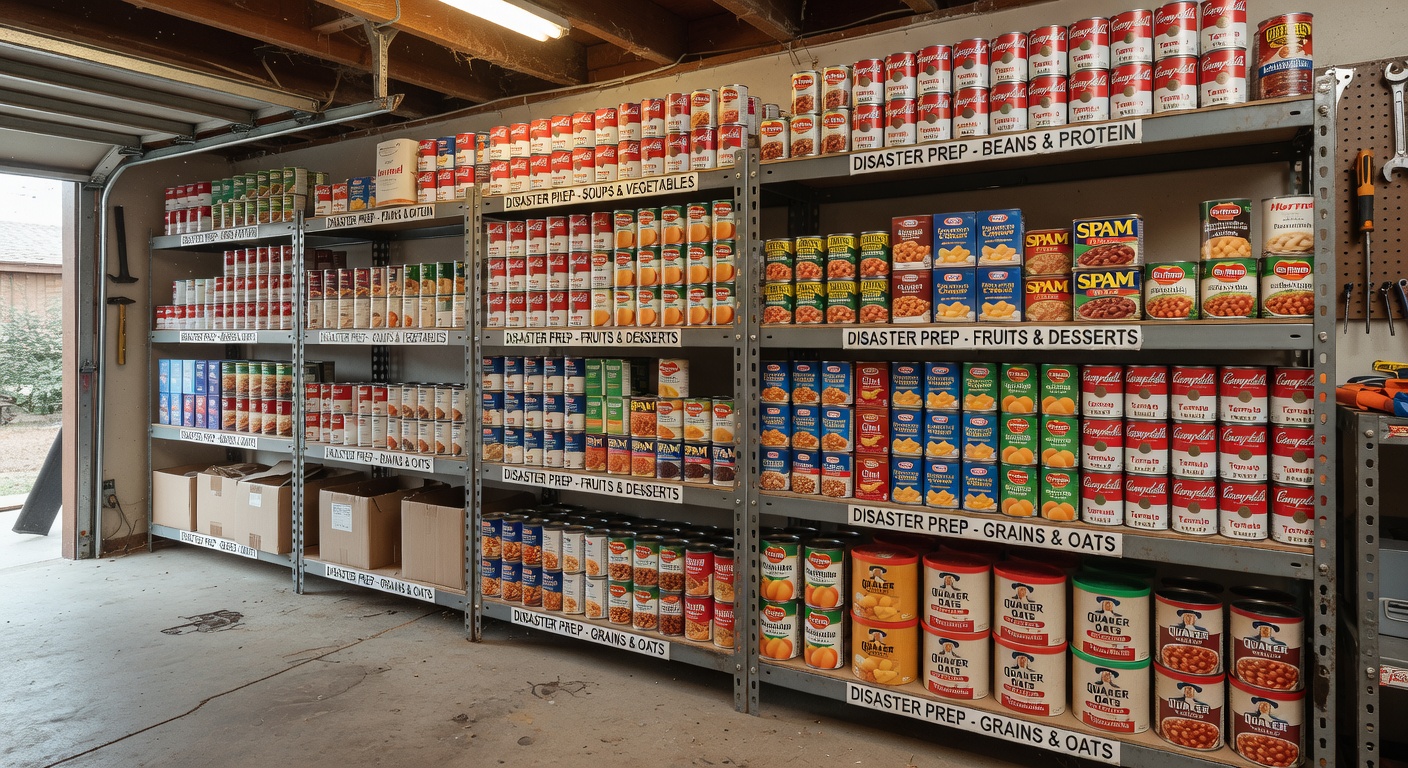
Building a Canned Goods Stockpile
Canned and retort-pouched foods form the backbone of any Japanese household's emergency food supply. Japan's food industry produces an exceptional range of shelf-stable products in retort pouch format — from curry (カレー) and rice (パックご飯) to mackerel in miso sauce (さば味噌煮) and seasoned chicken (焼き鳥) — that rival fresh cooking in taste and nutrition. Combined with traditional tinned goods, these products can sustain a household through an extended emergency while providing genuine comfort and familiarity.
The Rotation System (First-In, First-Out)
A stockpile that is never used becomes a pile of expired, wasted food. The most effective solution is the First-In, First-Out (FIFO) rotation system: new purchases go to the back of the shelf, and items are consumed from the front. This keeps your stockpile perpetually fresh and integrates it naturally into your regular meal planning.
Set up a dedicated shelf or section of a storage cupboard exclusively for your emergency supplies. Arrange items vertically, label the front of each row with a sticky note indicating the product type, and keep a simple inventory list (paper or a smartphone note) that you update as items are added or used. The goal is that every item in your stockpile gets consumed and replaced before its expiry date — you are maintaining a living reserve, not a time capsule.
What to Stock and How Much
Aim to cover at minimum these caloric needs: an adult requires approximately 1,800–2,200 kcal per day under normal conditions, though physical stress during an emergency may increase this. Plan for at least 1,800 kcal per adult per day when estimating quantities. Children and elderly family members have different needs — factor these in individually.
Build your stockpile progressively. Rather than purchasing everything at once, add two or three extra cans and retort pouches to your regular weekly shopping until you reach your target quantity. Many Japanese supermarkets run periodic "disaster prep" sections — especially in September around Disaster Prevention Day (防災の日, September 1) — where emergency food items are discounted and displayed together.
- Use a permanent marker to write the purchase date on every item you add to your stockpile.
- Arrange shelves so the earliest expiry dates face forward — rotate new items to the back.
- Set a calendar reminder every six months to review your inventory and pull items nearing expiry into regular meal use.
- Keep a printed inventory sheet inside the storage cabinet door. Update it each time you add or remove items.
- Take a photo of your fully stocked shelves for insurance documentation and as a visual reminder of your target fill level.
Foods Recommended for Emergency Storage
The following table covers the most practical and widely available shelf-stable foods for Japanese households, organized by category with typical shelf-life information and storage notes. Prioritize items that your household already enjoys eating — an emergency is not the time to discover you dislike tinned sardines.
| Food Item | Japanese Name | Typical Shelf Life | Notes |
|---|---|---|---|
| Retort-pouch curry | レトルトカレー | 2–3 years | Wide variety available; can be eaten cold from pouch in a pinch |
| Instant packaged rice | パックご飯 / アルファ米 | 1–5 years | Alpha-rice (アルファ米) made with only hot water; ideal for outages |
| Tinned mackerel (miso / soy) | さば缶 | 3 years | High protein and omega-3; eat directly from can with rice |
| Tinned salmon | 鮭缶 | 3 years | Versatile; use in onigiri filling or eaten plain |
| Tinned tuna | ツナ缶 | 3 years | Oil-packed retains calories; water-packed lower fat option |
| Tinned chicken (yakitori) | 焼き鳥缶 | 3 years | Great morale booster; multiple flavors available |
| Instant miso soup | 即席みそ汁 | 12–18 months | Freeze-dried varieties have longer shelf life; psychologically comforting |
| Cup ramen / instant noodles | カップラーメン | 6 months | Shorter shelf life; rotate frequently; high sodium — supplement with other foods |
| Dried pasta | 乾燥パスタ | 2–3 years | Requires cooking water; pair with retort pasta sauce |
| Retort pasta sauce | レトルトパスタソース | 2 years | Tomato-based sauces generally longest shelf life |
| Hardtack / emergency biscuits | 乾パン / 非常食ビスケット | 3–5 years | Dense calorie source; dedicated emergency versions available at disaster prep stores |
| Tinned beans (kidney, chickpea) | 豆缶 | 3 years | Excellent plant-based protein; usable in many dishes |
| Tinned corn / mixed vegetables | コーン缶 / ミックス野菜缶 | 3 years | Provides fiber and vitamins; supplement diet variety |
| Peanut butter | ピーナッツバター | 12–18 months | High calorie density; natural/unsweetened versions last longer |
| Honey | はちみつ | Indefinite (sealed) | Natural preservative; also useful for minor wound care |
| Salt (iodized) | 食塩 | Indefinite | Electrolyte replenishment; essential for cooking |
| Sugar | 砂糖 | Indefinite (sealed) | Rapid energy source; useful for oral rehydration solutions |
| Infant formula (if applicable) | 粉ミルク | 12–18 months | Critical for households with infants; keep extra supply and rotate carefully |
Beyond the items in this table, consider adding multivitamin supplements to compensate for the nutritional gaps that can develop over an extended period of eating shelf-stable foods. Vitamin C deficiency in particular can develop within weeks on a diet lacking fresh fruit and vegetables.
Storage Tips for Small Japanese Apartments
The single most common reason Japanese households give for not maintaining an adequate emergency food and water supply is lack of space. This is a genuine challenge in a country where the average urban apartment is 30–60 square meters, but it is one that can be solved with creative thinking and a willingness to repurpose existing storage areas.
Dead Space and Hidden Storage
Most apartments contain more usable storage than residents realize. The space under a raised bed or loft bed is large enough for dozens of water bottles and canned goods when organized in stackable clear plastic bins (available at Nitori and IKEA Japan). The area beneath a sofa, if raised even slightly on furniture risers, can accommodate flat-packed retort pouches in a vacuum-sealed bag. The top shelves of closets (押し入れ) that are difficult to access daily are perfectly suited for slow-rotation emergency supplies.
The "Living Stockpile" Approach (ローリングストック法)
Rather than treating emergency supplies as a separate inventory to maintain, integrate them into your kitchen pantry using the ローリングストック (rolling stock) method endorsed by Japan's Cabinet Office. Purchase slightly more of the shelf-stable foods you already eat regularly — an extra three cans of tuna, two extra retort curry pouches — and store them in your normal kitchen storage. As you use them in daily cooking, replace what you take. This keeps your emergency supply perpetually fresh without requiring any dedicated storage space beyond what your kitchen already has.
Vertical Storage Solutions
In the kitchen and storage areas, maximize vertical space with adjustable wire shelving units. A 180cm tall free-standing wire shelf with five or six tiers (available at Cainz, Konan, or Nitori for ¥3,000–¥8,000) can hold 50–80kg of food and water in a footprint of just 45cm × 90cm. Use clear labeled bins on each shelf so contents are immediately visible. Attach the unit to the wall with an anti-earthquake strap (家具転倒防止ベルト) — essential in Japan — to prevent it from toppling in a seismic event.
Furniture That Doubles as Storage
Ottoman-style storage benches, hollow bed bases, and dining benches with interior storage compartments are widely available in Japanese furniture stores and online. A storage ottoman in the living room can hold several weeks' worth of retort pouches and adds stylish, functional furniture to your home. When purchasing new furniture, prioritize models with built-in storage.
Earthquake-Proofing Your Storage Area
Japan-specific consideration: store heavy items (water containers, large tins) on lower shelves. Heavier items at height pose injury risks when shelves tip during earthquakes. Use non-slip mats beneath water containers and bungee cords or net restraints across the front of shelves to prevent items from falling. Cabinet locks (扉ロック) keep kitchen cupboard doors closed during shaking. These measures protect both your supplies and your household members.
Your emergency food supply must reflect the specific dietary needs of every person in your household. A one-size-fits-all approach can create serious health risks when medical support is unavailable:
- Food allergies — Review every item in your stockpile for the top allergens: wheat, dairy, eggs, soy, peanuts, buckwheat, shrimp, crab, and tree nuts. Many retort foods and instant noodles contain hidden allergens. Keep an up-to-date list of household members' allergens posted inside the storage cabinet.
- Celiac disease / gluten intolerance — Standard alpha-rice, plain canned fish, and naturally gluten-free items are safe. Avoid soy sauces (contain wheat), most instant noodles, and many retort sauces. Confirm each product's labeling carefully.
- Diabetes — High-carbohydrate emergency staples (rice, crackers, ramen) can cause dangerous blood sugar spikes. Stock extra protein and fat sources (tinned fish, nuts, peanut butter) for household members managing diabetes. Maintain an adequate supply of any required medications.
- Infants and young children — Do not rely on adult emergency foods for babies under 12 months. Maintain a separate supply of age-appropriate formula, baby food pouches, and soft foods clearly separate from adult supplies.
- Elderly family members — Dysphagia (difficulty swallowing) may require softened or thickened foods. Retort porridge (おかゆ), soft tofu products, and dedicated medical nutrition products are available in soft texture formats designed for the elderly.
- Religious and cultural dietary requirements — Halal, kosher, vegetarian, and vegan households should verify that stockpile items meet their requirements. Japan has a growing range of certified halal canned and retort products available through specialty retailers.
Shop Emergency Food Kits